Custom Mapping Xone K3 Ableton for Live Set
Hey,
I just bought CSS3 and already spent a couple of hours trying to figure it out. I am a live act and want to create a custom script to use the Xone K3 to control Ableton. Here are my questions for now (I will edit and update along my exploration):
1. How can I use more than 4 return channel? Can I say that the Layer 2 only changes the upper encores and knobs, but the rest stays the same? So I could use up to 12 return channel with the 3 Layers? How can I implement the Layer and Shift function?
2. If I use two Xone K3 controllers, how can I connect them, so if I scroll on one, it also scrolls or updates on the other one (session box, faders etc.)?
Thank you so much for your help, I really appreciate it and do hope someone can make this work. I’d love to keep CSS3.
Best regards
Hi,
In answer to your questions:
1. For scrolling navigation of the redbox/session box,
add a Session Box Navigation mapping type
In the navigation section, set Navigation Type to scroll
Session Box Navigation: https://community.remotify.io/knowledge/how-to-add-navigation-for-the-session-box/
2. You can use modes to setup multiple pages of controls
Modes: https://community.remotify.io/knowledge/modes-mode-selection/
3. Change the midi channel for one of the controllers. Do this on the hardware itself.
4. See 2
Thanks
Thank you for answering. Some new questions:
- How can I change the LED colours according to the playback state (similar to Push 3)? So green when it plays, blinking green when it is launching, white when it is idle and no LED when there is no clip?
- The same goes for stop all clips in the track, how do I change the LED colour there that it is always off and only reacts to a toggle?
I spent many hours now trying to get everything to work, but unfortunately the session box keeps crashing in Ableton and the entire script breaks. The session box LED feedback does not update correctly and then just stops working all together. Especially in global mode it does not work correctly if you assign several parameters to one knob via different modes/layers.
Is there any fix or way to make the session box stable in Ableton 12.4 with the Xone K3? Otherwise, the software is not working as intended for me unfortunately
Are you seeing any data in the CSS log when this happens?
If you could copy/paste it in here that would help alot.
(clear the log first, then make it crash, copy/paste)
CSSlog: https://community.remotify.io/knowledge/the-css-log-panel/
How can I change the Layer so all settings stay the same except for the upper knobs to now control Return 4-6 instead of 1-3?
And can I create a Shift Function that when I hold the Shift button, certain buttons get a new function assigned as long as I hold the Shift button?
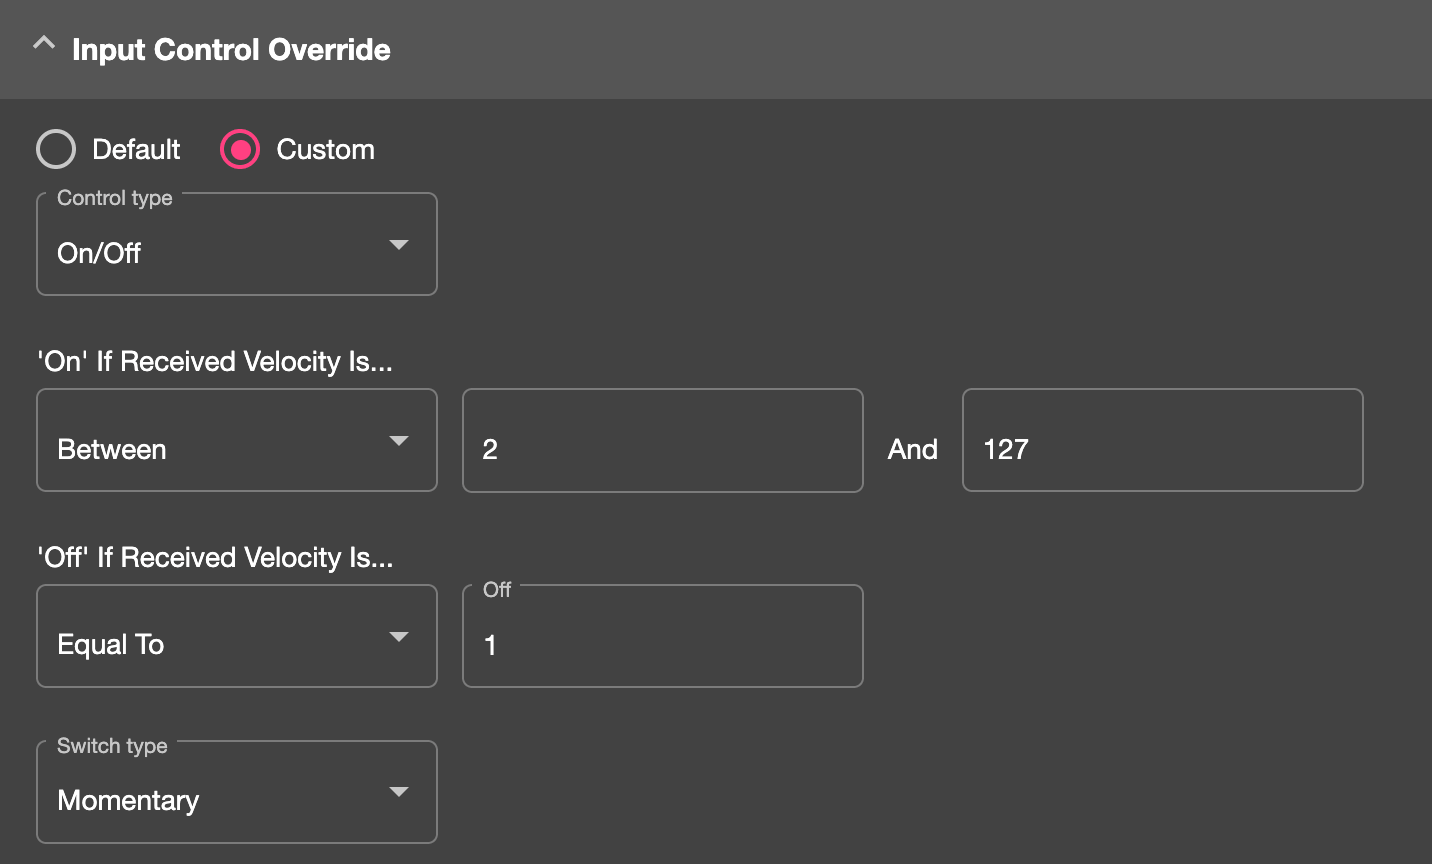
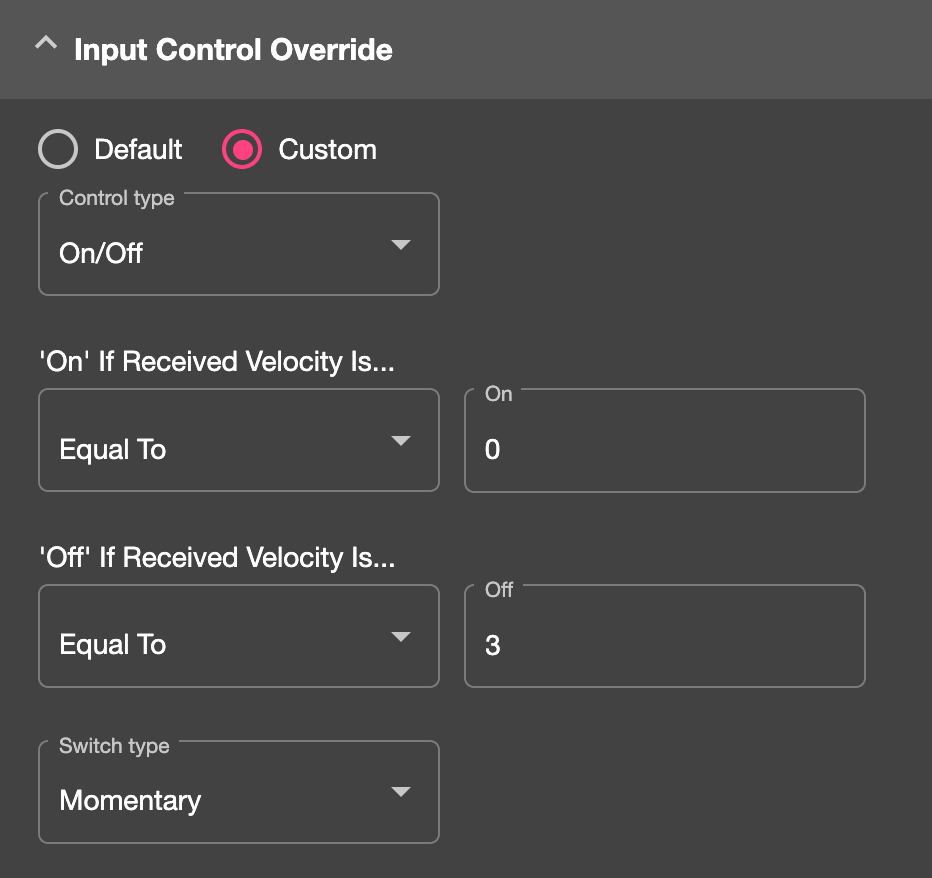
To make a shift style button which switches between modes, you need to add 2 mode selector mappings.
I’ve attached a script containing the mapping described below which you can import into CSS and use. just make sure to change the controller input (button/pad), modes to select and ensure the input control override sections will work for your input.
For this example we will be switching between mode 1 and 2.
(make sure the button you are using is momentary, not toggle)
add a mapping to select mode 2 when button is pressed, a second mapping to select mode 1 when the button is released.
In each mapping, choose the mode which will be activated.
Then change the ‘Input control override’ to custom.
The key is to change the ‘off’ velocity value of the first on to a value which the button DOESN’T send when it is released – so anything but 0.
Then the second mapping, change the On value to 0 so the mapping fires when the button is released. Then change its off value to anything other than the value sent when the button is pressed – so usually anything but 127.
Sign up
User registration is currently not allowed.
The Session Box mapping type has LED feedback options. These send midi velocity values back to your midi controller pads/buttons when certain clip events happen such as launching, playing, stopped.
The older Xone K2 controller wasn’t able to use these due the way the hardware was programmed, I’m not sure about the K3.
The other way would be to use Reaction mappings to send midi data to the K3 when clip events happen. This will require a fair amount of investigation however.