Found a way to use timers/animation with Ableton
Recently learned about threading in python, which is a way to have multiple different functions run at the same time.
Without threading, functions would be run one after the other, which means the next function in line needs to wait until the current one is finished.
If, for example, your current function has a sleep_timer set to 10 seconds, then it would take 10 seconds before the next function in line is called.
Because of this, we can’t simply use a timer in our Reactions because it would jam up Ableton until the timer has finished.
With threading however, the function with the sleep_timer could be counting its 10 seconds away while a second function has already fired up.
How to initiate a thread
The following image shows the basics:

When the thread is started, it will run whatever code is inside myFunction.
Notice how myFunction is inserted in the Thread using the keyword argument target.
However, you might want the code in myFunction to be in a loop. How would you exit the loop?
When using your code inside a Reaction, you can use Modifiers to carry the on/off switch:

Example
I’ve added a Reaction to this post with an example. It’s made for MIDI Fighter Twister with a momentary switch, although you could use any controller, as long as you don’t forget to adjust the condition, which checks if the button you’re using as a Listener has a value of 127.
This Reaction uses the following code:

As you can see I made 2 functions:
- lower_volume
- Lowers the master volume by 0.01 every 0.1s when a thread has been activated
- toggle_volume_lowering
- This is the function that is called by the Reaction
- When a thread is already active, it stops that thread
- When no thread is active, it creates and activates a thread that runs the lower_volume function
Post-scriptum
I was also able to make the LED’s on my MFT animate in a pattern (continuously changing colors of the inner and outer buttons of the device) while still being able to use Ableton.
Yes, I think it’s possible. I made flashing LED’s before using this method. Handling the flash and shine like you’re asking shouldn’t be too difficult. I’m finishing up on something else first, then I’ll look into this.
Hi Makill, I’ll post my progress on your request in an answer here. This comment is meant as a notification.
Thanks John. I’m working on a class in a user.py file (+ some documentation) to set up actions with that perform after holding a button for some time. If it’s ready, I’ll make a separate post about it.
That´s cool! Now you can have Launchpad Pro functionality (touch fader) with a simple Launchpad Mini…..
Dieter
Just a simple example for a reaction, works well. Code is more or less self explaining.

Dieter
Hi Makill, I’ve been working on your request, still need to test it and put in some safeguards/warnings. I was wondering what you’d want to name the function. Currently I’ve named it “toggle_delayedSwitchLED” which sounds a bit unwieldy.
I’m also now realising you probably want a certain action to play out when the flashing LED starts.
What I’ve set up at the moment only handles the LED feedback:
– When pressing a button down, it consistently shines the LED.
– If the LED didn’t flash before holding down the button, it will now start flashing upon release.
– pressing and holding down the button again will again make the LED shine consistently
– releasing the button now won’t make the LED flash
Is this what you were looking for? And does the function need to do something else?
Here’s a look at the code:
toggle_delayedSwitchLED = the function that would be called by pressing and releasing a button
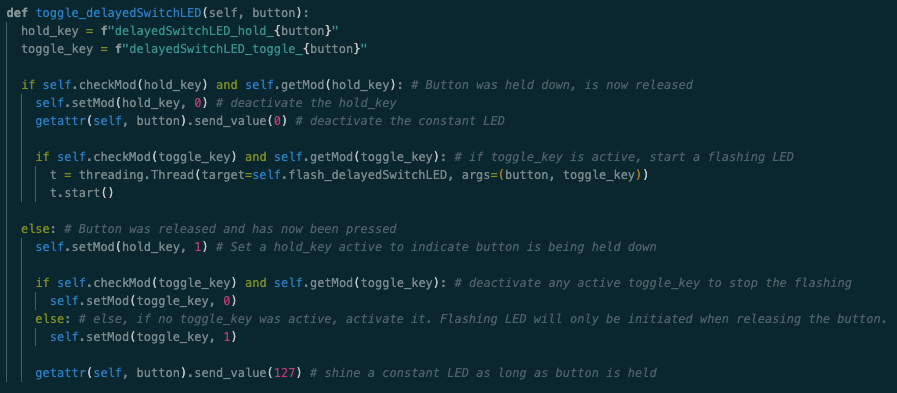
flash_delayedSwitchLED = the function that handles the flashing of the LED

Hi Makill,
Here’s a link to the user.py file. There is info on how to use the toggle_delayedSwitchLED function inside the document. It works as listed out in my previous comment.
There are also a few other functions, some of which are being used by toggle_delayedSwitchLED, that can be used separately as well:
- A custom modifier dictionary with a few functions to manage it with. Used by
toggle_delayedSwitchLED. - A custom log function that I’ve used for warning and error messages. Used by
toggle_delayedSwitchLED.- It gives the ability to add a short all-caps descriptor before the actual message, making it easy to visually filter all of the messages.
- The `timed_action` function and class that were made for making custom button_hold actions with. NOT used by
toggle_delayedSwitchLED.
Let me know if this is what you wanted or if you had something different in mind.
Hi,
I’ve been looking into your user.py and to be honest I am a bit confused by it. It contains something about inner ring, outer ring and multiple colors, which I am not certain what is meant by it. I am using Akai MidiMix which has buttons that have only ON(127) or OFF(0) state and have only one color on each button.
What I was hoping to achieve is that I would have 8 buttons set up as SOLO buttons for 8 tracks that could be pressed briefly to turn SOLO for each track and begin flashing to indicate SOLO is ON, then pressed again to turn SOLO OFF which would stop flashing or held (either one or more buttong at the same time) to activate SOLO and light up held button for as long as it is held.
to simplify things:
– Button 1 is pressed -> track 1 SOLO is ON and Button 1 LED start flashing until pressed again, which deactivates SOLO and LED flashing
– Button 1 is held -> Track 1 SOLO is ON and Button 1 is lit up until released, , which deactivates SOLO and LED feedback
I’ve been trying to achieve this dual button function with your timed_action reaction and would like to add LED feeback to it.
hope this sums up what I am trying to achieve.
Thanks for your help.
My apologies. Seems I’ve uploaded the wrong user.py file. I’ve updated the link with the correct one.
I misunderstood the ‘holding down’ part. I’ll fix that in an update.
I’ll also check if I can make the soloing work as you describe.
I have a MIDIMIX at home, and I’m guessing you’re using the same template from on Remotify (?), so I should be able to test it out in full.
Yes I am using Remotify template for MidiMix
Hi Makill01
The updated user.py can be found here. I’ve also added pre-made Reactions for all of the top row buttons on the MIDIMIX that you can import. It also contains 3 mappings for setting up a Session Box and moving it left and right. I left them in so you could see how the Reactions work with the Session Box, but you may remove those Mappings, they aren’t vital to the Solo buttons.
On my end it seemed to work well. Let me know if you encounter any problems.
1. Little explanation how to call and use the function
I tried to keep the function of the previous function as much the same as it was. The LED functionality can be used on its own. I just added a way for it to trigger another function, which I’ve called an “action” in the parameters of the function. So I also added a separate function, called `MIDIMIX_toggle_solo`, that handles triggering the solo button.
Here’s an example of how the function is called in a Reaction:
self.user.toggle_delayedSwitchLED(0, 1, action=self.user.MIDIMIX_toggle_solo, action_args=(0))
- The first 2 parameters (the 0 and 1) represent the channel and value of the button who’s LED we want to trigger. Channel and value can be found by hovering over the button in the Template. Important: you’ll need to subtract 1 from the channel that’s seen in the Template. Channels in the template start at 1 but in the code channels start at 0.
- The 3rd action parameter needs to call the function that will toggle the solo button. The function is part of user.py and thus needs to be called as
self.user.MIDIMIX_toggle_solo. MIDIMIX_toggle_soloneeds itself 1 parameter, the number of the track we want to manipulate (relative a Session Box, if one’s present). This is done viaaction_args, i.e. the arguments for the action, to which in this example I passed (0). The parentheses aren’t really necessary if there’s only 1 parameter. It’s also possible to pass keyword arguments to the action by passing a dictionary to action_kwargs.MIDIMIX_toggle_solodoesn’t need kwargs, I’m just mentioning it for if someone wants to use this function with a different action.
2. Important for anyone else wanting to use this function
If anyone else wants to use this function, there’s one important keyword argument that isn’t visible in the example: button_type. By default, button_type=”note” because this function was initially built to use with an AKAI MIDIMIX of which the buttons send NOTE messages. But on a lot of other MIDI Controllers, buttons send CC values. If that’s the case, then you need to add the parameter button_type=”cc”.
It’s important when you’re passing a channel and value to the function because the function then has to build the structure of the object that points to the button inside the main script which looks like this: midi_{button_type}_ch_{channel_number}_val_{value_number}. Examples using channel 0 with value 1:
- In case of a NOTE message: midi_note_ch_0_val_1
- In case of a CC message: midi_cc_ch_0_val_1
3. Another way to input a button to the delayedSwitchLED function:
Instead of inputting the channel and value, where you need to keep the button_type in mind, you can also deliver the entire button_string to the function. With button_string I mean (example) midi_note_ch_0_val_1 or midi_cc_ch_0_val_1. You can easily find this button_string by temporarily making a Condition in a Reaction wherein the button you need is selected. The button_string will then be visible under the Condition. Here’s the alternative version of how the above example would be called this way:
self.user.toggle_delayedSwitchLED("midi_note_ch_0_val_1", action=self.user.MIDIMIX_toggle_solo, action_args=(0))
As you can see, the button_string replaces the first 2 parameters of the previous example. It’s important to put this button_string inside quotes. There’s no need to signify a button_type because the button_string already contains the type.
Amazing work, thanks a lot. Just what I’ve been looking for.
Sign up
User registration is currently not allowed.
Would you be able to make flashing led function that could be incorporated into your user.py file and used along side of timer so that it could be used to make buttons behave like delayed switches that flash when toggled and shine when held?
been really interested in your code, so i started doing some changes so that I could use it as delayed on/off switch and figured id be nice if my buttons blinked as well depending on their function.